en-US

Targets


User roles for this feature

Admin Co-admin Asset Manager Viewer
Targets View
Add/Edit/Delete


Overview

Targets are the endpoints for synthetic probing traffic from agents

The following article describes target functionality and management.

Target types

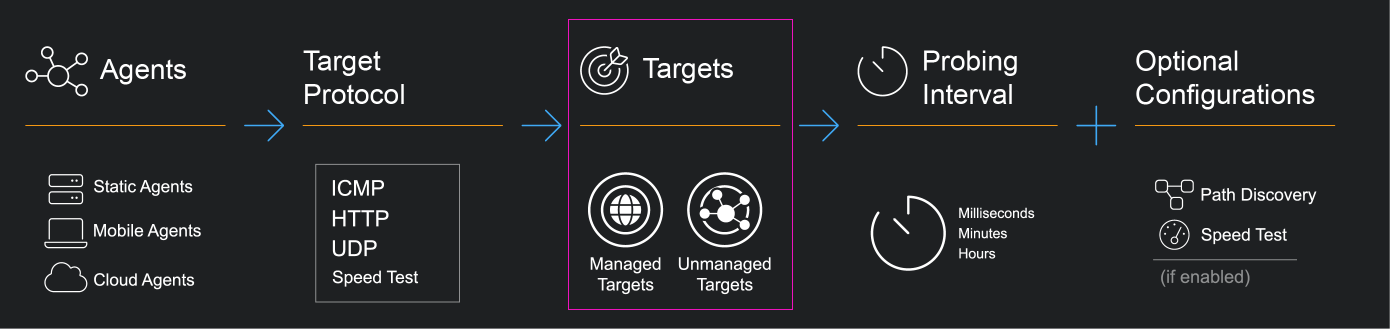
Service Experience Insight supports Unmanaged Targets and Managed Targets

  • Unmanaged Targets are public IP addresses and domains that receive synthetic probing traffic from agents
  • Managed Targets are agents with target functionality enabled that receive synthetic probing traffic from other agents
  • Probing protocol and available metrics vary by target type


Protocol by target types

ICMP HTTP UDP Speed Test
Unmanaged Targets --
Managed Targets --


Metrics by supported protocol

ICMP HTTP UDP Speed Test
Jitter (ms) --
Loss (%) -- --
HTTP Availability (%) -- -- --
HTTP Request Response Time (ms) -- -- --
Connection set up DNS lookup (ms) -- -- --
Initial connection (ms) -- -- --
SSL (ms) -- -- --
Request Response Request Send (ms) -- -- --
Waiting TTFB (ms) -- -- --
Content Download (ms) -- -- --
Hops Latency (ms) --
Probing Interval Default 30 seconds 60 seconds 30 seconds 1 hour
Probing Interval Custom 1 sec. to 10 min. 30 sec. to 10 min. 100 millisec. to 10 min. 1, 6, 12, 24 hrs.
Probing Duration NA NA NA 3, 8, or 10 sec.


Targets Page

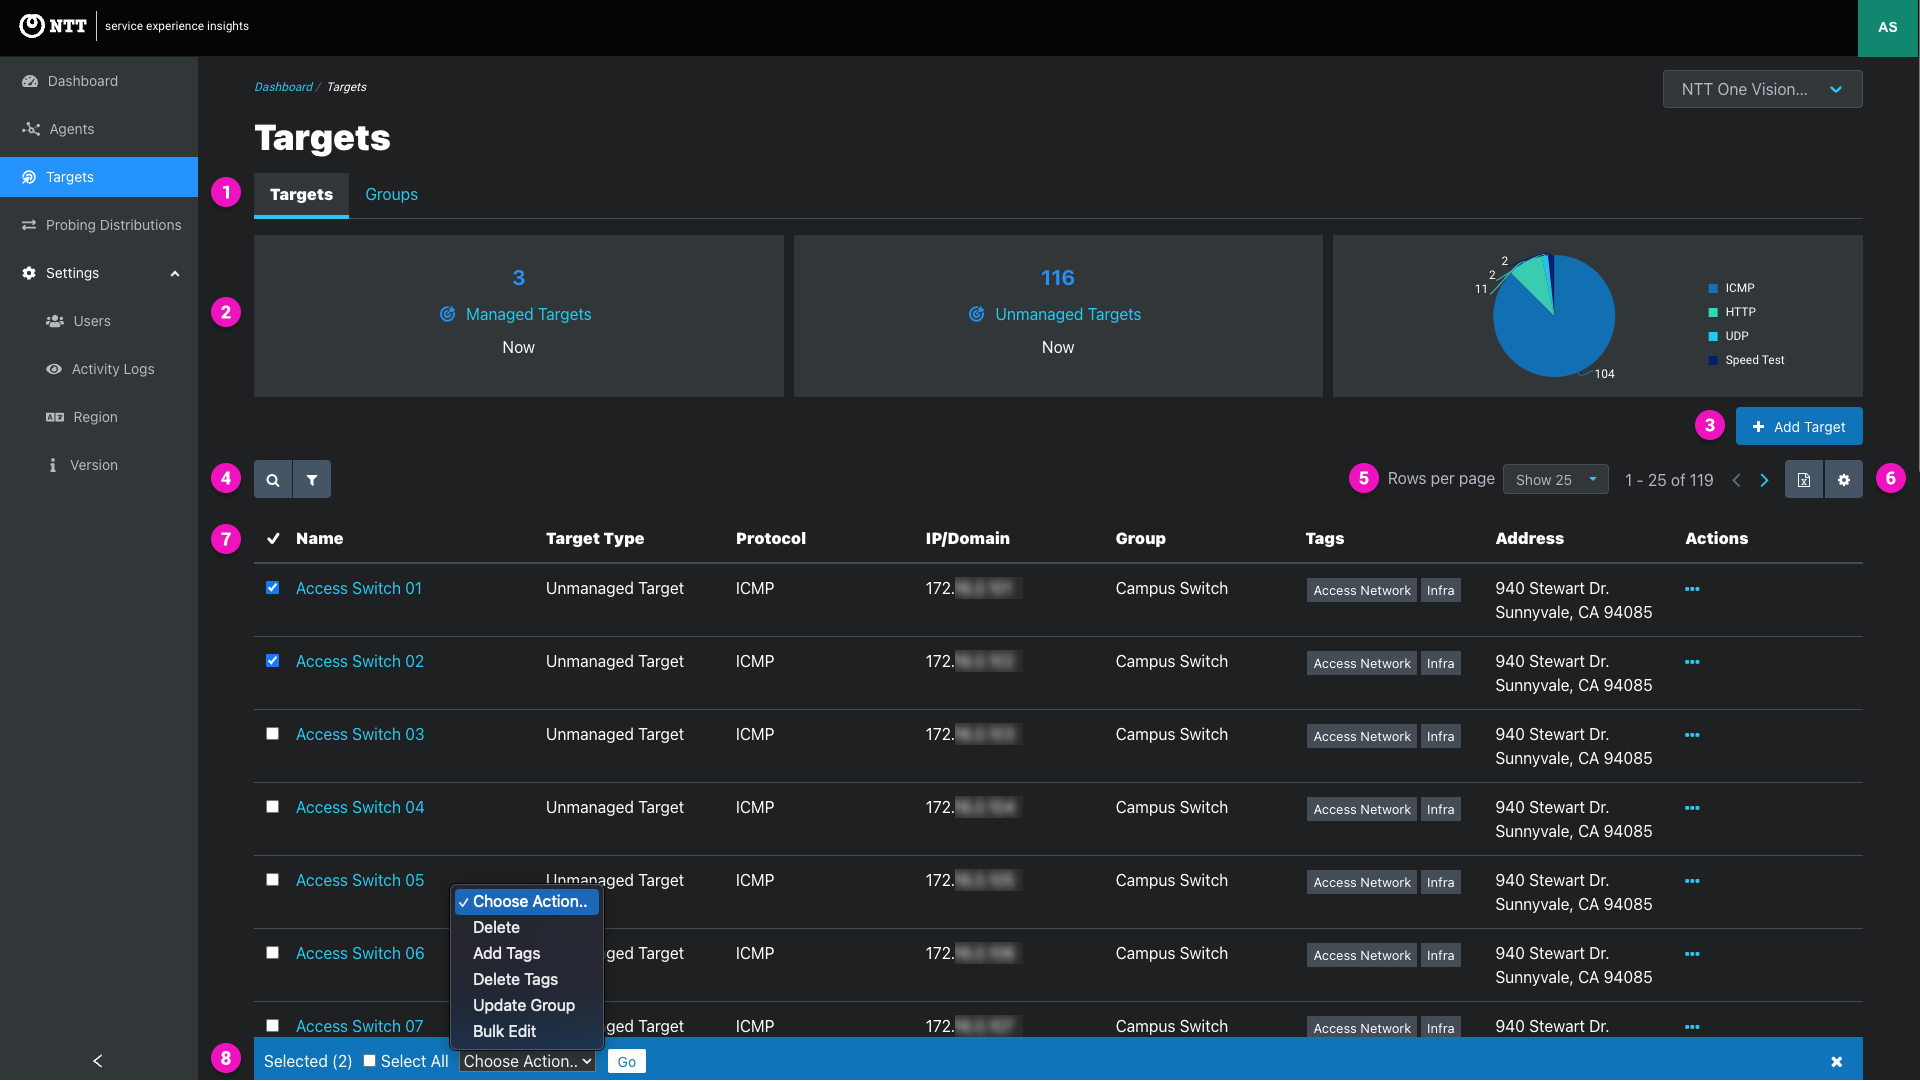
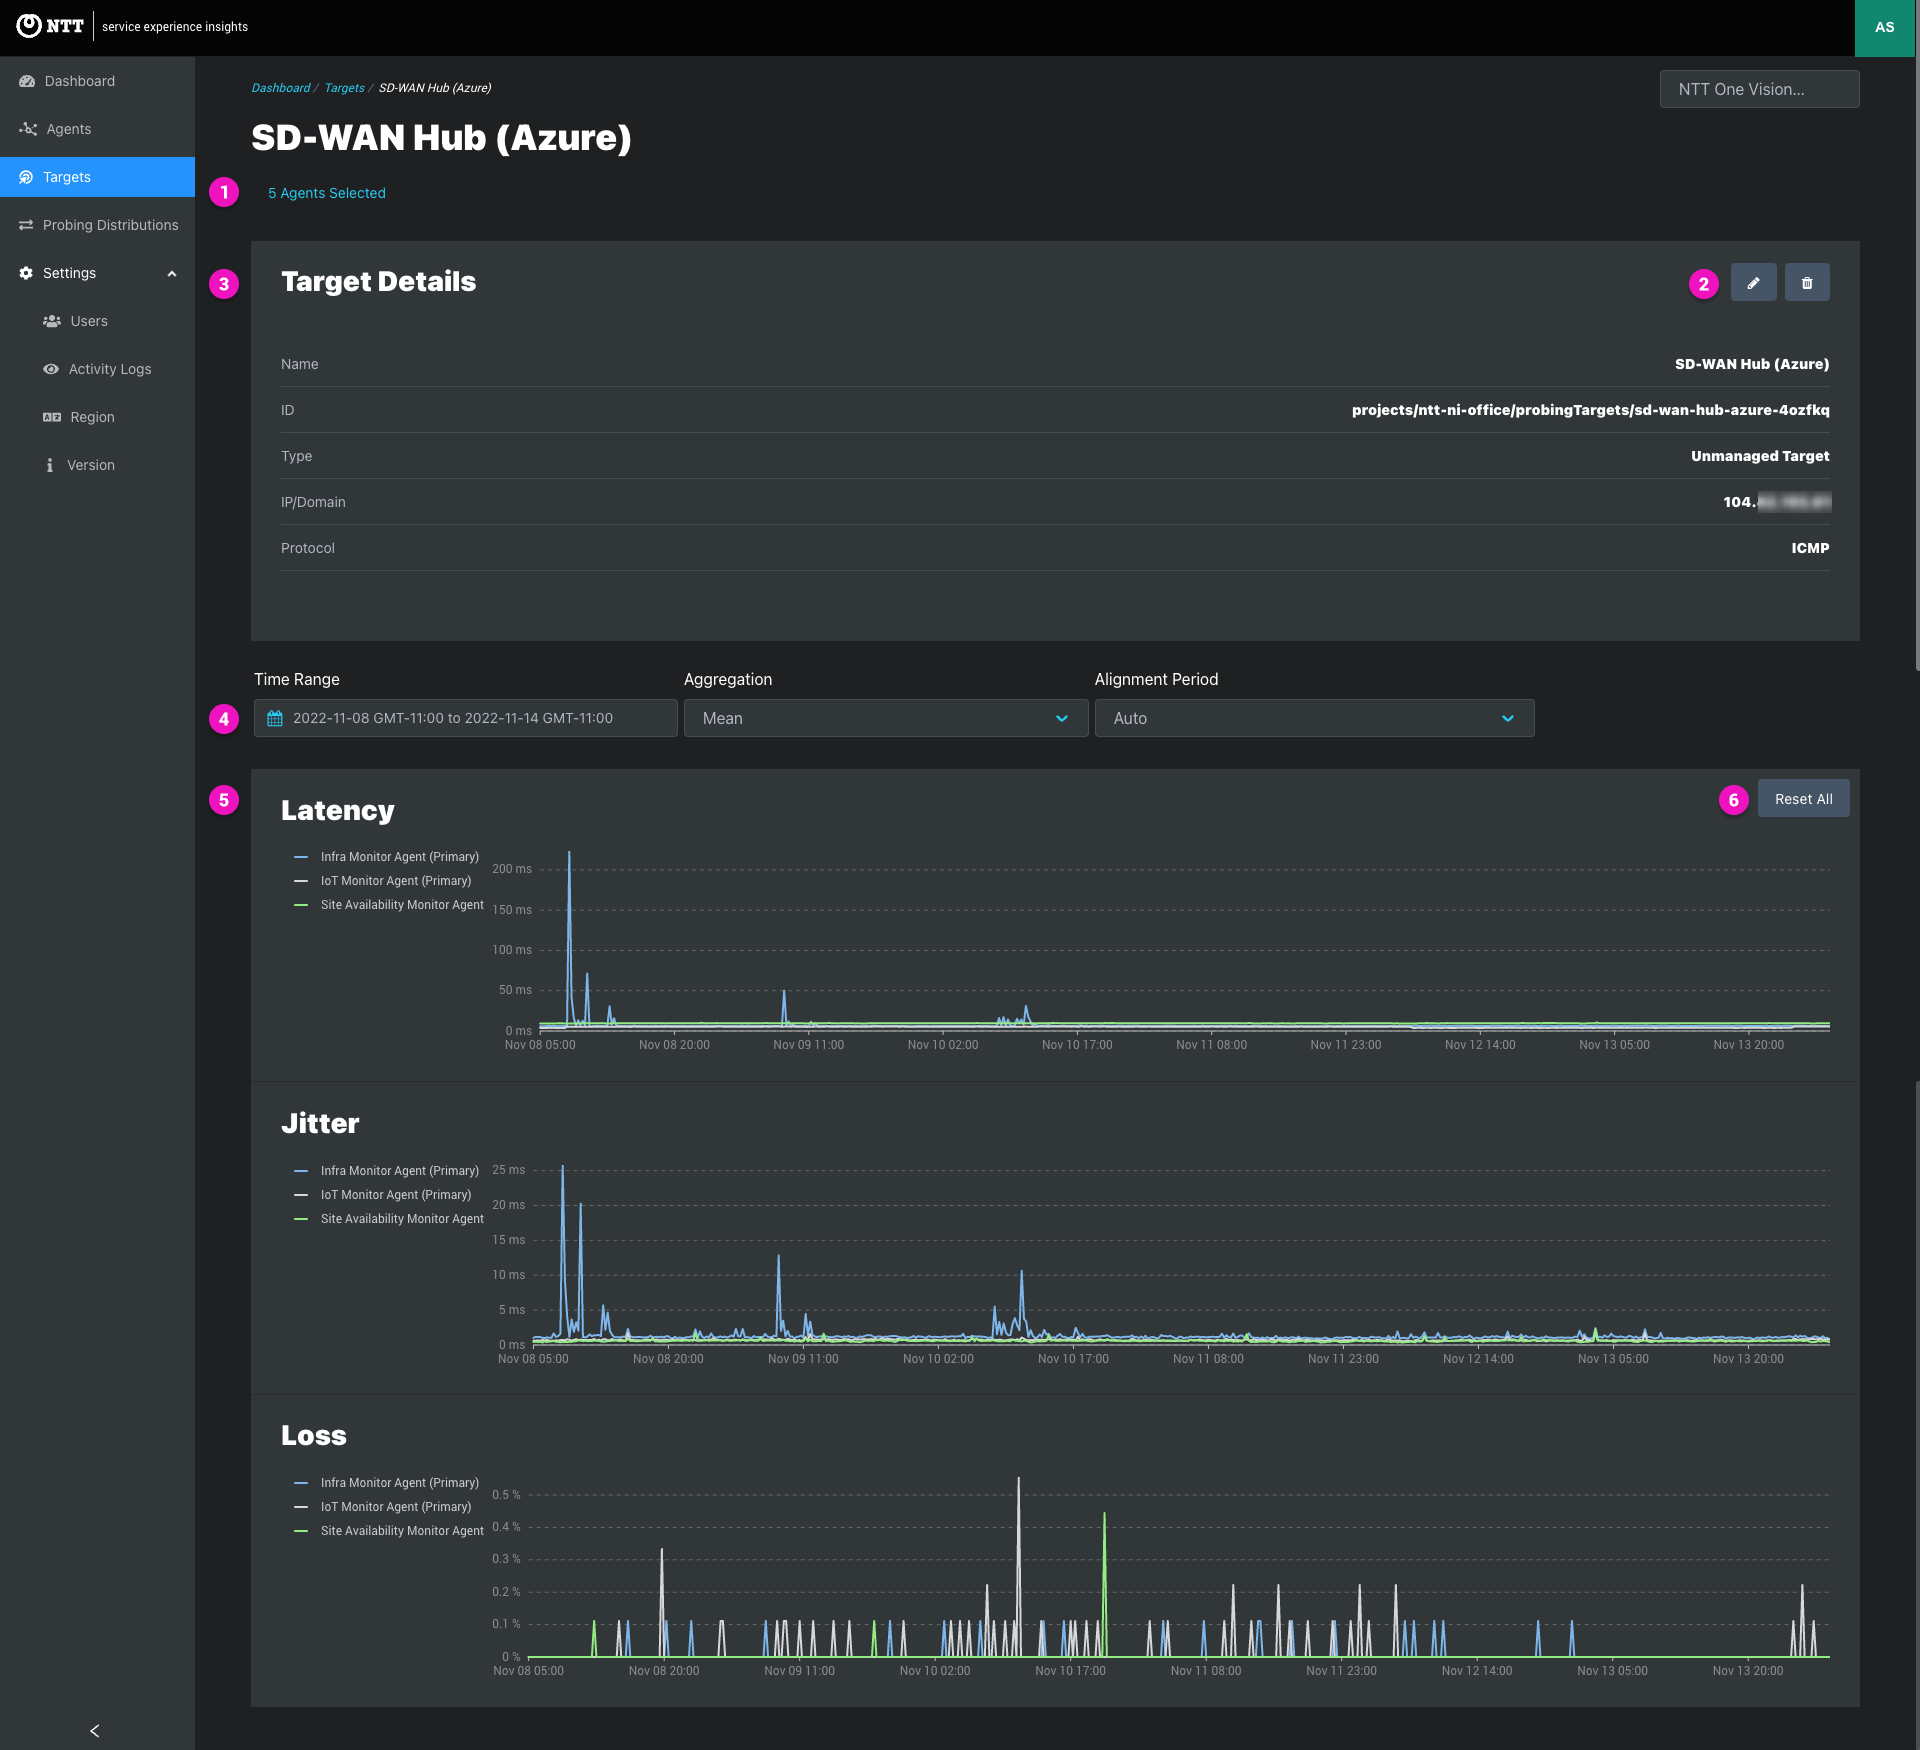
1. Page tabs - View targets and target groups

2. Info panels - Panels summarize the current count of managed targets, unmanaged targets, and targets by target protocol

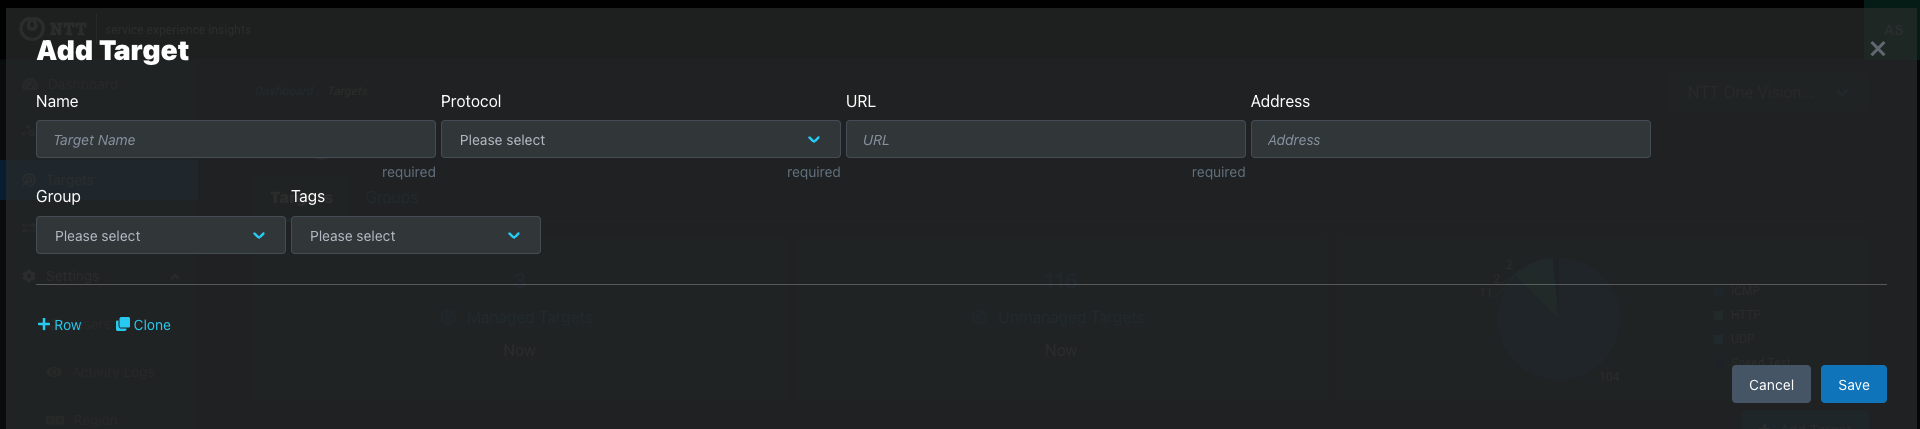
4. Add Target button - Click to open the add target modal to create unmanaged targets; see Adding targets.

5. Search and filters

Search - Click the icon to expand text search to quickly find Targets by a variety of target attributes.

  • Text search supports partial matches and fuzzy logic
  • Queries are limited to one text search. Use filters to combine multiple attributes
  • Combine a text search with one or more filters to create and statement queries
    • Example: Combining search and filters to return all targets in the WiFI Access Points (Groups filter)in Sunnyvale, CA (test search) returns
Searchable Target Attributes
Attributes Usage note
Location Primary location of agent used as a managed target
- Search by any part of the Target’s primary address like street name or county
- Latitude/longitude is not searchable. Lat/long input as the Target’s location resolves to the nearest address
Target ID Target ID is the Target’s unique identifier
- Lowercase and hyphenated Target name appended with a unique six-digit alphanumeric string in this format: “cloud-vm-gcp-us-west2-lo-59eccr-ICMP”
- Searchable by all, or part of the unique identifier string
Target Name Search by all or part of the targets display name
Group Search by all or part of group name
- Use filters to return targets from multiple groups
IP/Domain Search by all are part of the target’s IP or domain
Tags Search by all or part of a target name
- Use filters to return targets from multiple tags
Type Search managed or unmanaged targets


Filters - Click the icon to use filters. Multiple filters create and statements.

Filter Key Operator Filter options Example
IP/Domain equals Text entery: Full or partial IP or domain name
Groups Contains Target groups list
(multi-select)
Types Equals Managed Target or Unmanaged Target
(single-select)
Tags Contains Any Target tags list
(multi-select)
Protocol Equals Online Targets, Offline Targets
(single select)


6. Pagination

  • Tables support up to 100 rows per page.
  • Pagination controls show the count of items in the table.
  • Filtering and sorting change the count.
  • Use the dropdown to change the number of items shown in the table. Twenty-five items are shown by default.
  • Clicking the right arrow requests the next page of items, and the left arrow reloads items from the previous page.
  • Paginated results load sequentially, and arrows are disabled until the items in each request are loaded.

7. Table Sorting

  • The name and groups columns are sortable.
  • Tables are sorted by Unicode value and load in ascending order (A-to-Z).
  • Clicking the name or group column label changes the soring order.
  • A white arrow will appear to the right of the column label.
    • indicates that the table is sorted in ascending order.
    • indicates that the table is sorted in descending order.
  • Table sorting is a function of the search API.
    • When the label is clicked, a request is sent to the server to return paginated results in ascending or descending order.
    • Advancing the pagination loads the next page of items in the order specified.
    • Changing the sorting order will show that any level of pagination shows the reverse order or that level of pagination.
    • Example: Assume a table has 675 items; 25 items start with each letter of the English alphabet, and the table is set to show 24 items per page.
      • Table loads the 25 items starting with A in ascending order.
      • Advancing to the next page loads the items 26-50 that start with the letter B.
      • Changing the sorting order of the second page will show items 626-650 starting with Y.
  • Unicode characters are normalized before sorting to provide a better search experience. For example, using special characters like “①” (U+2460) in resource names may result in unexpected sorting behavior.

8. Table export and customization

  • Export table
    • Click the icon to export the Target record in .CSV or .JSON format
    • Each export outputs the Targets and columns visible on the Target table page —-a maximum of 100 Targets per export
    • Use pagination arrows to load additional table pages for export
    • Raw API values are exported and may differ from the plain-language labels and values seen in the dashboard
  • Customize table columns:
    • Click the icon to open the table customization modal
    • Table customization is stored in the web browser’s local memory and does not change the view for other users
    • Clearing the browser cache or using a different browser resets the default table columns and column widths
  • See Table Export and Customization in the Agents article for a full explanation of table customization options

8. Target list

Column Displayed Value
Checkbox for selecting Targets for bulk editing
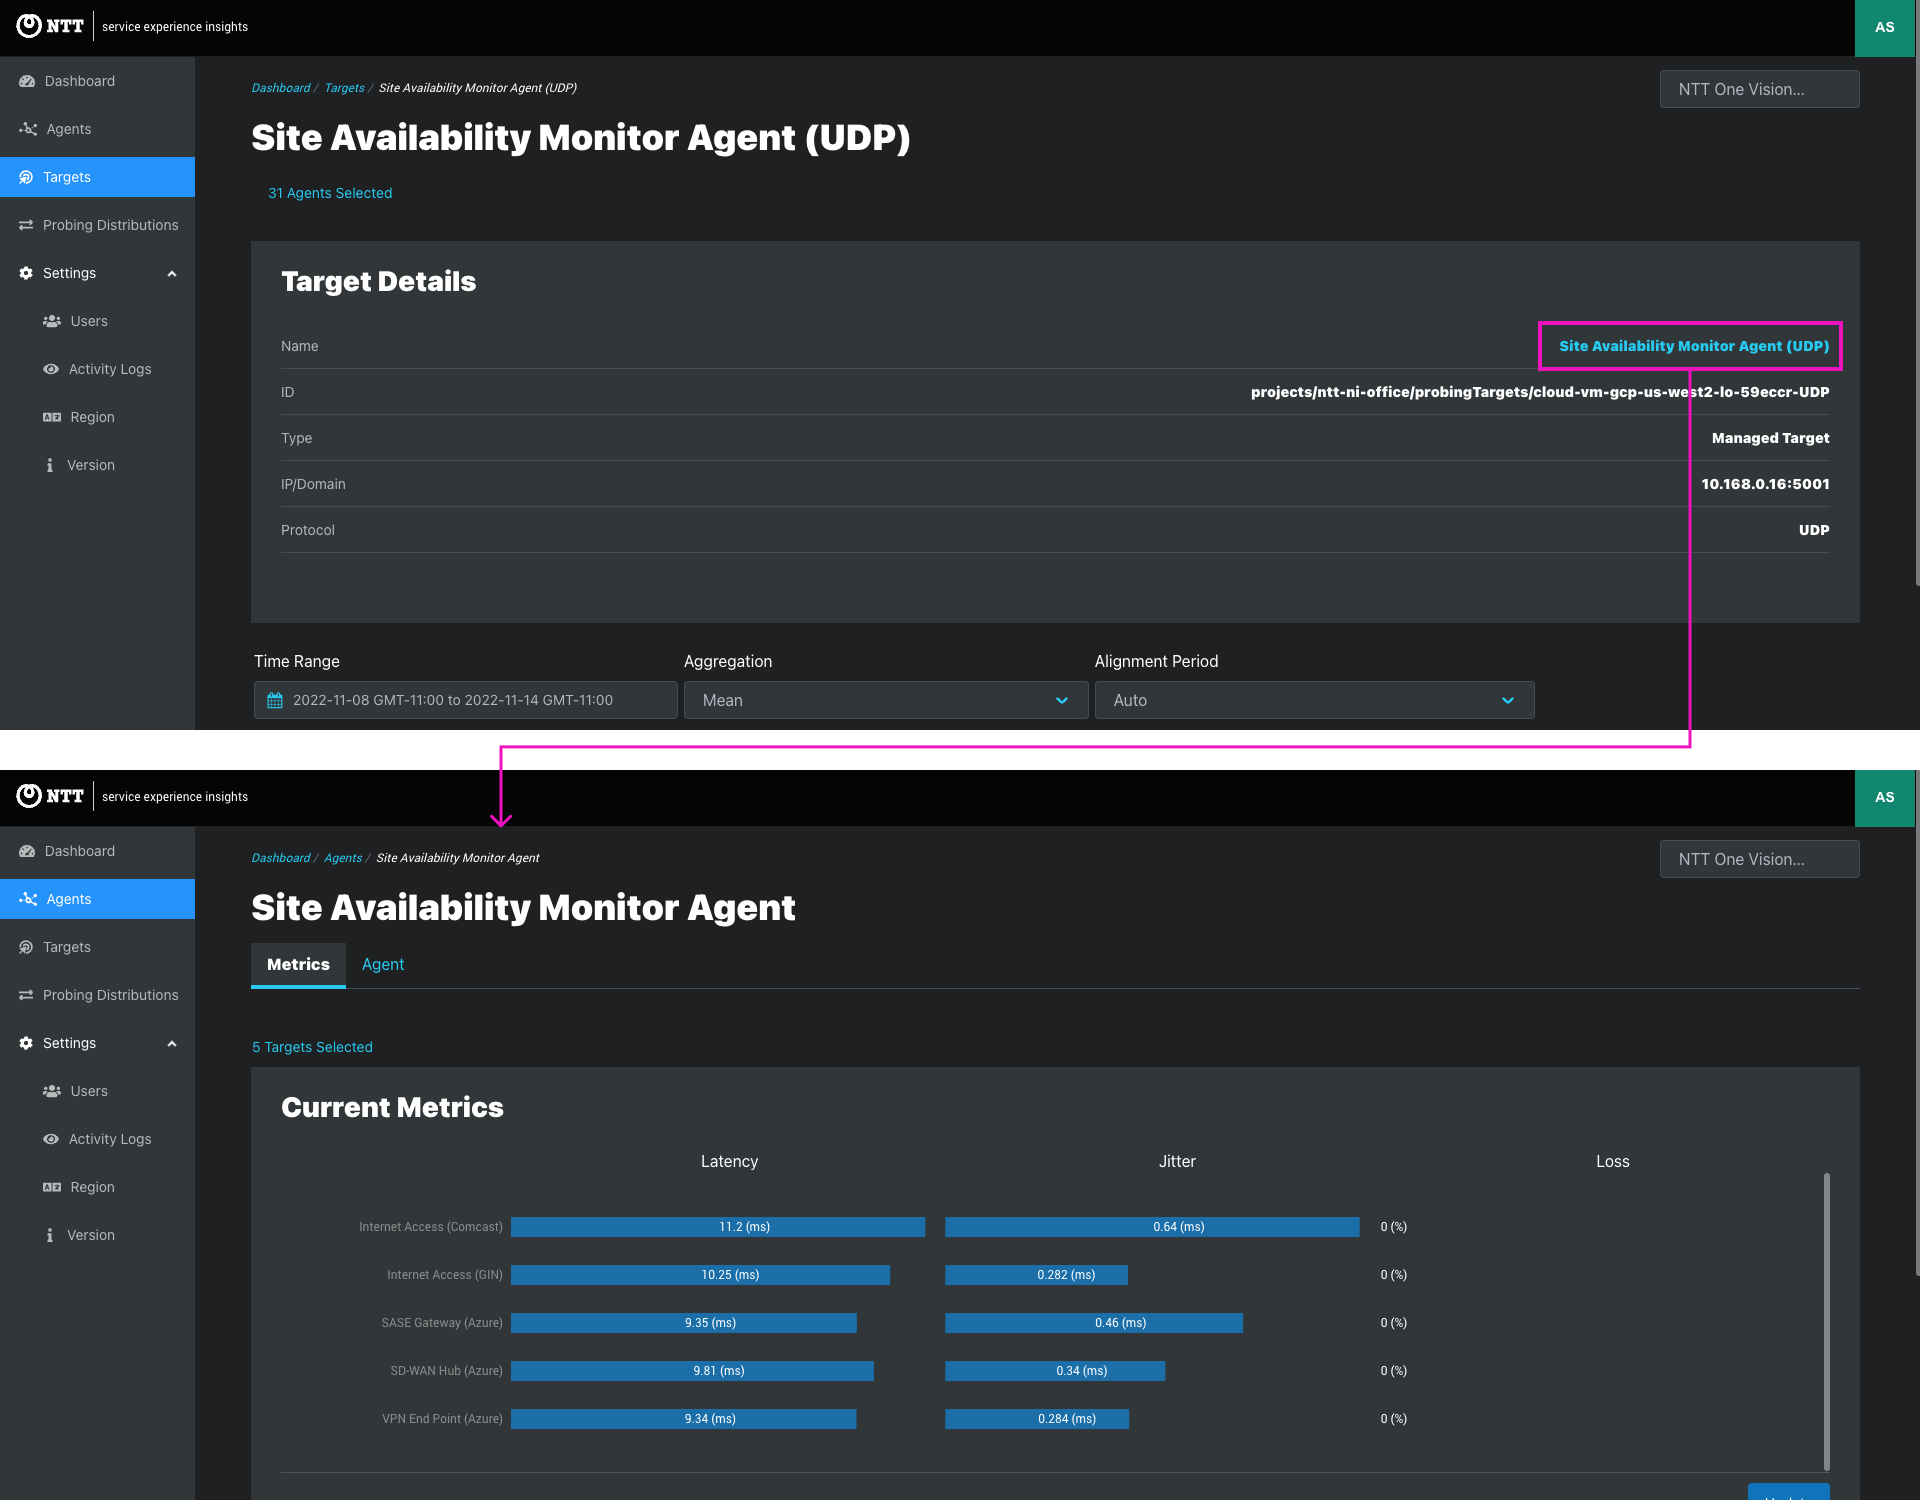
Name Target’s display name link
- Click through to the target page to view metrics and information about the target
Target Type Group assigned to the target
Protocol Target protocol(s)
- Managed targets support ICMP, UDP, and/or Speed Test target protocols
- Static and cloud agents with target functionality enabled become managed targets. Learn more about managed target agents in the Agent Configuration seciton of the Agents article
IP/Domain IP or domain assigned to the target
Group Group assigned to the target
Address Target’s primary location
- Full or partial address shown
- Lat/long input as the Target’s location resolves to the nearest address
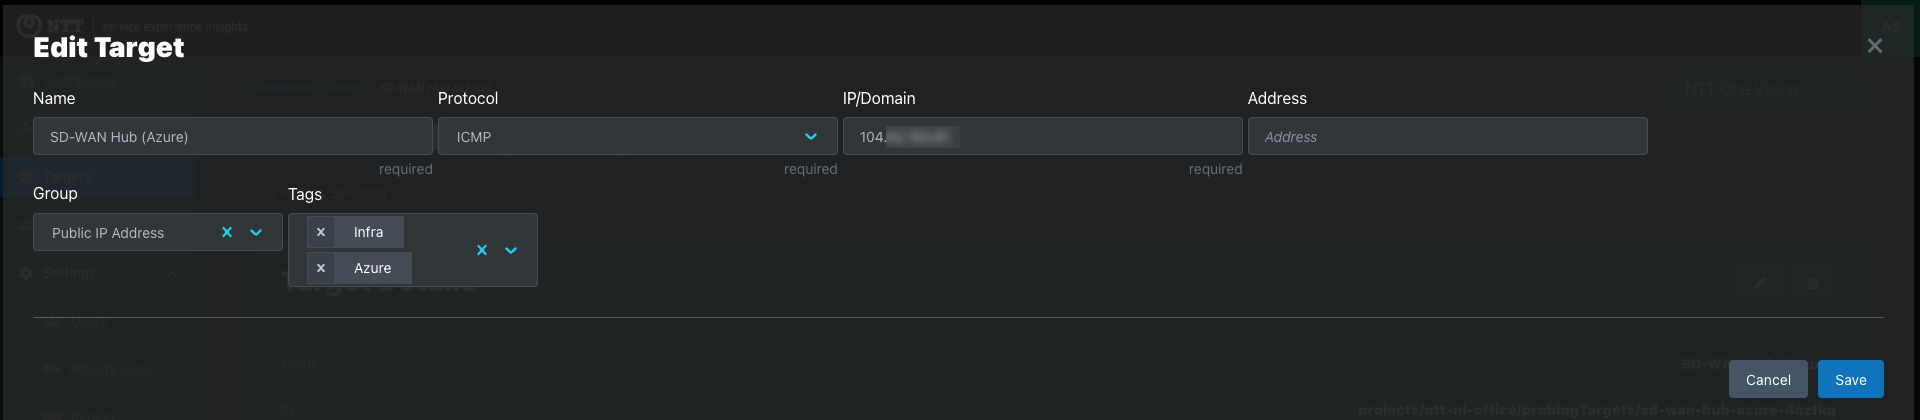
Actions ellipsis icon to open the actions menu
Edit opens the editing modal
Delete opens the confirm deletion modal


9. Target selector and bulk editing

  • Search or filter the Target list to edit the status and properties of one or more Targets
  • Click the checkbox(s) to select specific Targets, or choose “select all” to edit or delete all visible Targets in the table
  • Choose a bulk editing option from the footer menu:
    • Delete Targets
    • Add Target tags
    • Delete Target tags. This removes the tags from the selected Targets. The tag is deleted and no longer assigned to any Targets
    • Update group. Add, change, or remove the Target from a group
    • Bulk edit opens the edit Target modal populated with the selected Targets. Use this method when editing different Target attributes for the selected Targets
  • Deleting Targets
    • Deleted Targets and all associated Target data are lost permanently and cannot be recovered
    • The Target deletion modal requires the user to enter the number of Targets to be deleted and to click the confirm button
    • Target can be deleted by users with Admin, Co-Admin, and Asset Manager roles. See User Management to learn more about user roles and privileges


Adding targets

  • This modal is used to add Unmanaged Targets only
  • Agents with target functionality enabled in automaticallybecome targets and are listed on the target table

  • Name the target
    • Unique target names are not required because a unique target ID is assigned when the target is created
    • Logical, unique, and descriptive naming for each target is recommended
  • Select the target’s probing protocol
    • Unmanaged targets support one protocol per target record
    • Create a target for each protocol
    • For example, create two targets to send ICMP and HTTP probing to Service A
      • Target name: Service A (ICMP), Target Protocol: ICPM, Target address: Service A IP
      • Target Name: Service B (HTTP), Target protocol: HTTP, Target address: Service A domain
    • URL (Target Address)
    • Enter target IP for ICMP, UDP, and Speed Test targets
    • Enter target domain (URL) for HTTP targets
  • Add the target address * Address is optional but helpful if the service will be accessed in multiple regions * Unmanaged targets with addresses will appear on the target’s page map in future versions
  • Group
    • Select an existing group from the dropdown list
    • If a new group is needed, complete the target creation process in progress. Then create a new group in the Groups tab of the Targets page and add edit the target to include the new group
    • Learn more the target group roles and usage
  • Tags
    • Select one or more of the existing tags from the dropdown list
    • Type a tag name to search long lists. If that search text does not match an existing tag, a new tag is created and assigned to the target
    • Create a variety of tags to create more associations between targets
    • Thoughtful tagging makes it easy to create custom metrics views or automatically add or remove tagged targets from a probing distribution, such as:
      • Service insights: “SaaS Services”, “WiFi Access Points”, “Office365 Availability”, “Genesys Cloud API”, etc.
      • Specific network segments or host device types: “Switch Group A”, “Wifi Access Points”, etc.

Target groups

Target groups provide the highest level of association between targets.

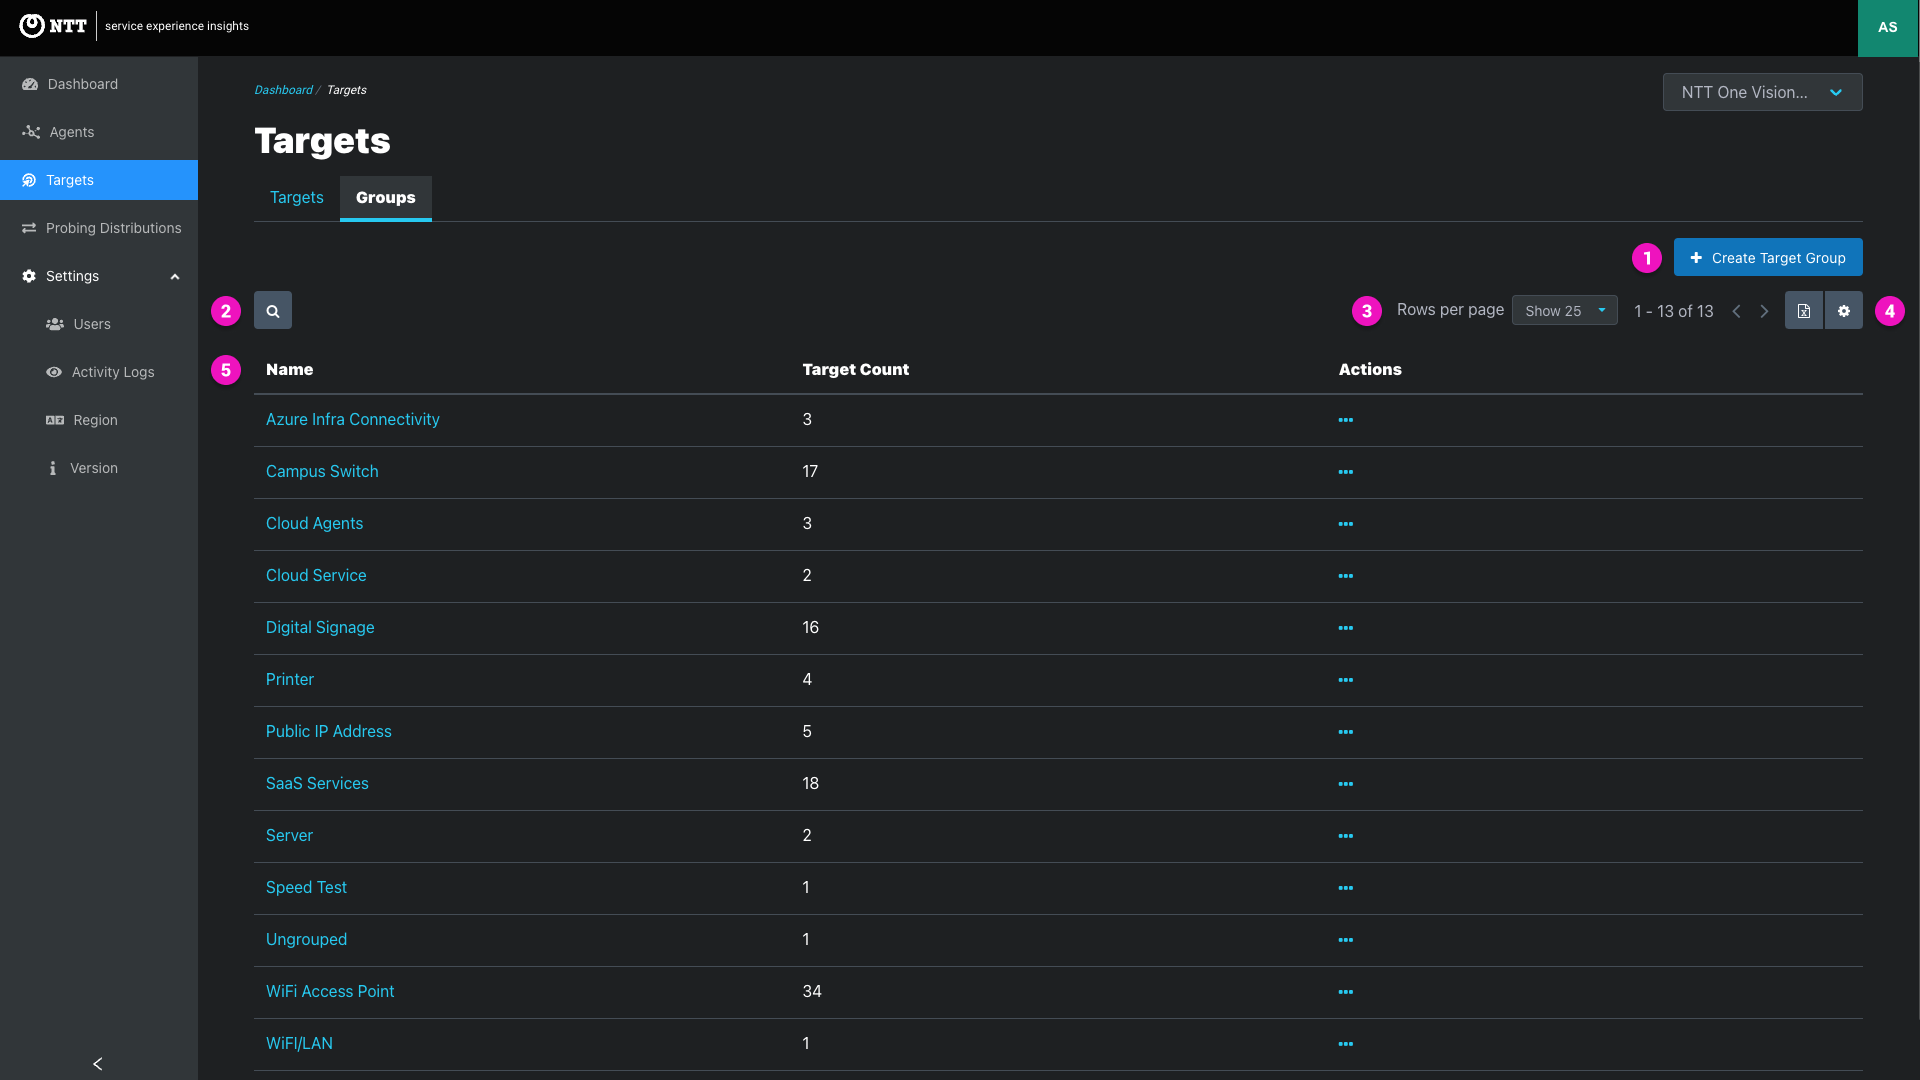
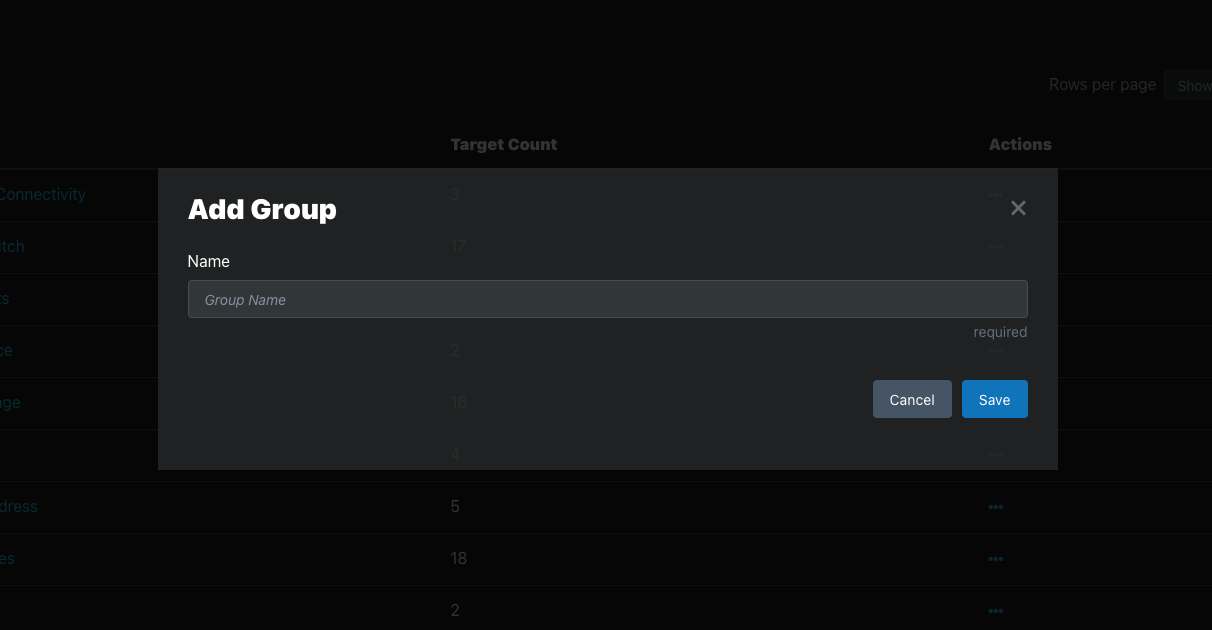
1. Create Target Group button

  • Click to open the create group modal
  • Enter a group name and click save
  • The new group will be available in the Add target and edit target modals

2. Search Groups

  • Search for groups using text search
  • Filters are not supported

3. Pagination - Tables support up to 100 rows per page

4. Table export and customization

  • Export table
    • Click the icon to export a list of target groups in .CSV or .JSON format
    • Each export outputs the Targets and columns visible in the Groups table page —-a maximum of 100 Targets per export
    • Use pagination arrows to load additional table pages for export
    • Raw API values are exported and may differ from the plain-language labels and values seen in the dashboard
  • Customize table columns:
    • Click the icon to open the table customization modal
    • Table customization is stored in the web browser’s local memory and does not change the view for other users
    • Clearing the browser cache or using a different browser resets the default table columns and column widths
    • See Table Export and Customization in the Agents article for a full explanation of table customization options

Target group roles and usage

  • Use agent groups to logically map agents to the monitoring use case. For example:
    • Service being monitored/use case: “SaaS Availability,” “Remote Workers Sevices,” “IoT vendor cloud”
    • Workgroups or functions: “Virtual Events Services”, “PeopleSoft”, “Customer Support Cloud”
    • Functional network area: “Access Switch,” “VPN concentrator,” “WiFi Access Points” ^
  • Logically grouped targets enable
    • Filtering lists, maps, and metrics to create meaningful dashboard views
    • Assign targets to a probing distribution
      • All current and future targets in the group will automatically join the probing distribution
      • Deleting or changing a target’s group removes it from the probing distribution
      • This eliminates the hassle of manually updating the probing distribution when new targets are deployed, or existing targets are deleted
  • Agent groups are used for managed targets
    • When target functionality is enabled for an agent, the agent becomes a managed target for other agents
    • Like agents, targets have groups called target groups
    • Because managed targets are an agent and agents cannot probe themselves, managed targets inherit the agent’s group. For example:
      • Agent A is in the “Monitoring Agents” agent group
      • Targeting functionality is enabled for Agent A
      • Agent A is now a managed target in the “Monitoring Agents” target group
      • Changing the agent group for Agent A changes the target group for the Agent A managed target automatically
    • Learn more about managed target

Target pages

  • Each target has a page showing
    • Target information
    • Monitoring metrics for Targets that are probing the target
  • Navigate to a target page by clicking a target name on the targets table or in the targets tab of a probing distribution
  • Unmanaged target pages differ from managed target pages
    • Unmanaged targets are configured in the target section only
    • Managed targets are target attributes of Targets, and configured from the Target pages

Unmanaged target pages

  • Target details
    • Name and ID
    • Type: Managed or unmanaged target
    • IP or Domain of the target
    • Target protocol:
      • Unmanaged targets: ICMP, HTTP, or Speed Test
      • Managed tartgets: ICMP, UDP, or Speed Test
  • Targets
    • All Targets are selected by default for target pages reached from the target table
    • Target pages linked to a probing distribution show metrics for the Targets used in that probing distribution
    • Click the Targets link to change the Targets displayed in the target metrics plots
  • Editing and deleting unmanaged targets
    • Unmanaged targets are editable from the target page or the actions ellipsis in the target table
    • Click the icon to delete the target
    • Click the icon to open the the target editing modal

Managed target page

  • The managed target page displays information about the target configuration of the Target used as the target
  • Latency, jitter, and loss metrics for all Targets that are sending synthetic probing traffic to the target
  • Map view showing the location of the targeted Target
  • Editing and deleting managed targets
    • Managed targets are NOT editable from the target page or the actions ellipsis in the target table
    • Click the linked target name to edit the Target’s target attributes as described in the adding and editing Targets section of the Targets article
    • Click the icon to delete the target
    • Click to open the the target editing modal


In This Article